Libre Office Impress: The Basics

November 2, 2026
Hello everyone and welcome back to the BootDrive Linux tutorials. Today, we'll be looking at a program called Libre Office Impress. Libre Office Impress is Linux's version of Microsoft PowerPoint. It allows you to create slideshow presentations. Today, we'll be looking at some basic tools to help you get started in creating your own slideshow presentation with the program.
First off, the icon for Libre Office Impress looks like this:

The icon looks a bit like a presentation board, if that helps you to remember. I placed mine on my Ubuntu computer's desktop taskbar, but if it is not on there, you'll have to find it by going to your apps screen by clicking on the Ubuntu logo in the bottom left-hand corner of your desktop taskbar. If it's not in there, make sure you have already downloaded the Libre Office suite of programs in the App Center program. Here's a link to one of our earlier tutorials about how to install that.
Upon opening Libre Office Impress you'll be greeted with this screen:

The Select a Template window will always appear when you either start up the program or choose to create a new presentation. Here, you can choose from various premade slideshow templates. These have their own color themes as well as font types. They can be edited after choosing one, so don't feel that choosing one locks you into a particular design scheme. If none of these templates are what you're looking for regarding your own presentation, just click the "Close" button on the Select a Template window and you can design your slides as you see fit. For this brief intorduction to the program, I will be choosing to close the Select a Template window.
Now, let's take a look at the toolbars for Libre Office Impress.

Much like Libre Office Writer and Libre Office Calc, the toolbars here have a similar design to them. There are two new options in the top toolbar, Slide and SlideShow, which we'll take a look at now.

The Slide dropdown menu has many different options. You'll use this a lot as you work on your presentations because here you can create new slides to add to your presentations, duplicate the current slide to add to your presentation, insert a slide from a file (usually another Libre Office Impress presentation file), change the layout of your current slide, change the background image for the current slide, change the properties regarding the current slide, and change the animation that plays when transitioning from the current slide to the next slide in your presentation. We'll showcase features like changing a slide's background image and slide transition animations in a future tutorial.
Now let's take a look at the SlideShow dropdown menu.

There aren't too many options in here, but they are useful. First, we have Start from First Slide and Start from Current Slide. Start from First Slide starts the slideshow presentation in full screen from the first slide in the slideshow presentation. Start from Current Slide starts the slideshow presentation in full screen from the current displayed slide. Rehearse Timings allows you to practice your timing in advancing from your current slide to the next slide and so on. In both Rehearse Timings mode and either of the presentation modes, you can advance to the next slide by pressing the right arrow key on your keyboard or to go back, press the left arrow key on your keyboard. Clicking on the black slideshow end screen or pressing the 'Esc' key on your keyboard will exit out of your presentation mode. In Slide Show Settings, you can modify the settings of your slideshow to loop your presentation if you wish, make your mouse pointer visable during presentation mode, keep the presentation on top (over other open windows on your computer), or connect a remote controller to the program so you can go through your presentation with the button on a remote control. If you do attempt to connect a wireless remote control to Libre Office Impress, make sure to follow your sepcific remote control's wireless connectivity protocols. It may require your computer to have Bluetooth enabled, so make sure your computer's motherboard has Bluetooth installed on it. You can check online by searching up the name of your computer or laptop and "does it have Bluetooth" on your search engine of choice if you don't know. You can also click the battery, sound, and Internet connectivity button at the top right hand corner of your screen on your Ubuntu device and if Bluetooth is either not listed there or is not highlighted in orange, there is most-likely no Bluetooth controller on your device's motherboard.
I know that was a lot, so bear with us because we're almost done covering the basics of using Libre Office Impress. I'll briefly go over the remaining two toolbars of the program.

Start from First Slide and Start from Current Slide are available on the quicklinks toolbar as seen above. This is just another way you can start your presentation if it makes it easier.

You can add an image or video to your current displayed slide by clicking the button pictured above that looks like a negative for a photo. This will bring up a window in which you'll have to select the saved image or photo you want on your slide on your computer.

The Insert Chart button on the quicklinks toolbar will allow you to add your own charts for visual aides during your presentation for your current displayed slide. Alternatively, if you don't want to create a chart in Libre Office Impress, you can also import one from Libre Office Calc to the program by copying (Ctrl and C on your keyboard) and pasting (Ctrl and V on your keyboard) the chart into your slide.
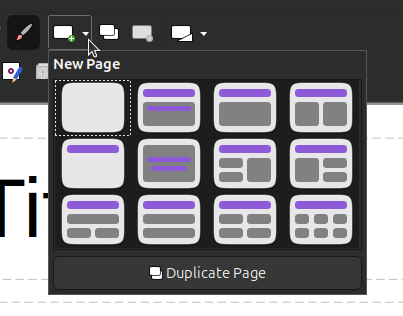
You can add new slides and customize the new slide's layout by pressing the button picured above. The dropdown arrow next to it can be clicked to see the various layouts that can be selected for the new slide. The purple on the slide layouts indicates the header/slide title fields. You can also duplicate your current slide from here.

Duplicate Slide can also be done by pressing this button pictured above.

This is the Slide Layout button. Here you can select a new layout for the current slide. This is useful especially if you created a new slide, but forgot to change the layout to something different than the other slides in your presentation.
Finally, one of the most essential features of Libre Office Impress is the Navigator.

The Navigator is located on the right hand side panel inside Libre Office Impress. The Navigator button is pictured above. It looks a little like a compass. This allows you to navigate through your various slides in your presentation when you're in edit mode. You can also rename your slides in here. I personally try to always keep this open.
And that's it for the basics of Libre Office Impress! If you ever wnt to save your presentation you can do so by going up to File and choosing "Save" or "Save As...", clicking the Save button on the quicklinks toolbar or pressing Ctrl and the S key on your keyboard. You can save these presentations as Libre Office Impress' default file format, .ODP or choose your own file format such as .PPT (for compatibility with Microsoft PowerPoint versions 1995 to 2003) or .PPTX for compatibility with Microsoft PowerPoint 2007 to the Microsoft Office 365 version. Make sure if you are creating a powerpoint to be compatible with Windows devices and/or collaborators, that you install and use Windows font types such as Times New Roman first.
As always, let me know in the comments if you felt like we missed something that we should include. You may have noticed that we have a login button now in the top right hand corner of our webpage and a Memberships button. In the future, we'll be releasing some more advanced member-exclusive tutorials that will go beyond just the basics of these various programs. Membership access will be very affordable at just $5 a month and if your purchase one of our Linux installation USB flash drives, you will also get a coupon code for 1 month of free membership access to the member-exclusive posts included in the packaging! Thanks for reading and we hope you have a great day!


Comments